Vs Jordan Bollin
Scenario: Standoff
I set up a game against Mark Howard. We were going to perform an experiment to see if his Iron Mother list could shoot down Skarre3. When I arrived, I was told that a change in opponents had been arranged and I would be playing against Jordan instead. As I had already discussed it with Mark, I only had my Skarre3 list and Jordan had brought his version of a Zaadesh2 list. Here are the lists.
[Skarre 3] Skarre, Admiral of the Black Fleet [+27] - Slaughter Fleet Raiders
- Kraken [36]
- Satyxis Blood Priestess [0(4)]
Axiara Wraithblade [0(6)]
General Gerlak Slaughterborn [0(6)]
Ragman [4]
Black Ogrun Iron Mongers [6]
Blighted Trollkin Marauders (max) [15]
Bloodgorgers (max) [15]
- Jussika Bloodtongue [5]
Bloodgorgers (max) [15]
Scharde Dirge Seers [6]
[Zaadesh 2] Lord Tyrant Zaadesh [+28] - Imperial Warhost
- Agonizer [0(6)]
- Agonizer [0(6)]
- Archidon [10]
- Archidon [10]
- Archidon [10]
- Archidon [10]
- Archidon [10]
- Basilisk Krea [0(7)]
- Cyclops Shaman [8]
Paingiver Beast Handlers (min) [5]
Paingiver Beast Handlers (min) [5]
Siege Animantarax [17]
Siege Animantarax [17]
I may have something wrong in his list, as I believe there was a mist speaker included, but what I have listed only leaves 1 extra point available. We rolled for initiative and I won. I know the archidons and turtles are fast, I felt like I needed to go first in order to establish the line of battle as far across the table as possible. I did not feel comfortable in this matchup and if I brought my normal pairing of Skarre3 SFR and Denny2 DH I probably would have played Denny2, but I figure getting these types of games in is always good practice.
Deployment: I went with my normal fairly symmetrical deployment with this list. A unit of bloodgorgers was on either flank, with Jussika attached to the right unit. The marauders deployed centrally. The kraken was placed between the marauders and the left bloodgorgers while Skarre went between the marauders and the right bloodgorgers. The dirge seers and iron mongers were spread out between the kraken and Skarre. Gerlack and Axiara were behind the marauders and next to Skarre's base, along with Ragman. The blood priestess stood behind Skarre.
Jordan deployed Zaadesh centrally. To Zaadesh's right was the Shaman, followed by a unit of beast handlers and an agonizer. A siege animantarax came next, with an archidon on the far right flank. To Zaadesh's left was the krea, followed by a unit of beast handlers and an agonizer. The second siege animantarax came next with another archidon on the left flank. The remaining three archidons were spread out across his back line.

Top 1: This was a standard first turn for me. Skarre activated first and cast dash, deceleration and put draconic blessing on the marauders. She then moved forward. The right bloodgorgers ran forward, arranging themselves around the acid pit. The marauders ran forward, with Gerlack, Axiara and Ragman taking up position behind them. The kraken ran forward, as did the left bloodgorgers. The dirge seers and iron mongers maintained their position of being spread out between Skarre and the kraken while running forward. Finally, the blood priestess moved up slightly. My turn ended with 54 minutes on the clock.
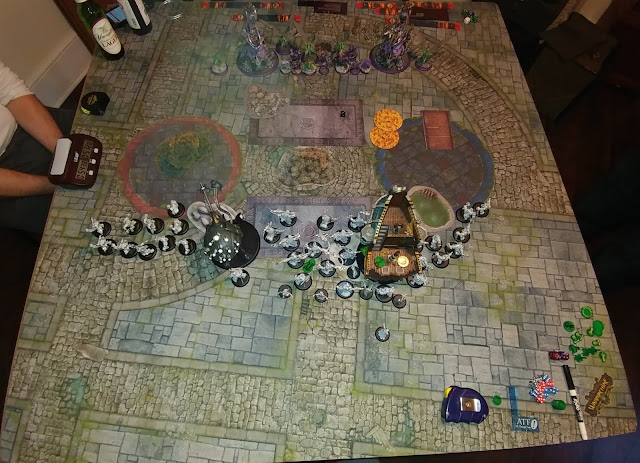
Bottom 1: Zaadesh cast battle charged and put inviolable resolve on something, probably one of the turtles. I think we ended up losing track of this later in the game, as I don't recall the armor buff getting factored into anything later on. At this point, he decided that my threat ranges were actually longer than he expected and he would go into defensive mode. His army rearranged a little bit, but overall moved forward less than three inches total. The right turtle took shots into my bloodgorgers, but either failed to crack armor, missed the shot or the tough roll was made. This was about the worst case scenario for him, since my bloodgorgers weren't knocked down and vengeance was triggered. The left turtle managed to kill two of the bloodgorgers in the unit. Both turtles repositioned back their three inches, putting them and inch or so behind his rectangle zone. The krea and shaman both put up the force aura and the agonizers. The beast handlers stood behind the two turtles, whipping to put rage tokens on them and then healing them back up. The right turtle ended with two rage tokens and the left ended with one. The two archidons on the flanks also took up positions behind their respective turtles and the three in the back moved up slightly to keep with the rest of the formation. Jordan's turn ended with 51 minutes on the clock.
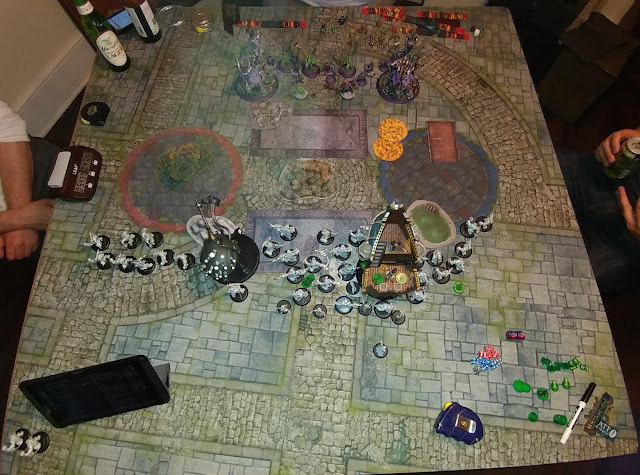
Top 2: I had forgotten how far the turtles could threaten with their shots, and then reposition back to safety. However, he had been rather timid in committing to the scenario, so I hoped that I could run forward fast enough to jam him out for a turn or two and make that my avenue for victory. The right bloodgorgers used their vengeance movements to come out from behind the acid pit and a pair of them were able to move into charge range of the right turtle. Skarre upkept draconic blessing for free and allocated full focus to the kraken. Skarre activated first and popped her feat. She cast dash, deceleration and guided fire. I did not cast dark waves, since I did not think I had a decent target to move forward. She remained standing where she was, as moving forward to get her cannon shots off would potentially put her in threat range of his turtles or beasts.
The right bloodgorgers charged forward. When the first one made it to the right turtle, the archidon standing behind the turtle triggered counter charge and killed the bloodgorger. The second bloodgorger with charge distance charged the archidon and put a little damage on it. The remaining members of the unit ran forward, trying to jam up the right zone, while staying out of the fire cloud. The marauders ran forward and around the forest in the center of the table. Gerlack, Axiara and Ragman all took up positions behind the center forest. The kraken walked forward and shot at the krea. Between the flayer cannon shots and helldriver, the krea died and the aoe blast killed a pair of beast handlers. The left bloodgorgers then ran forward around the forest in the left circle zone. Because of the lack of pathfinder, I was not really able to position to jam as effectively as the right unit did. The iron mongers walked forward with two repairing Skarre and the third standing by the kraken. The dirge seers maintained their formation between the huge bases and the blood priestess moved forward to stand closer to Skarre. My turn ended with 44 minutes on the clock.
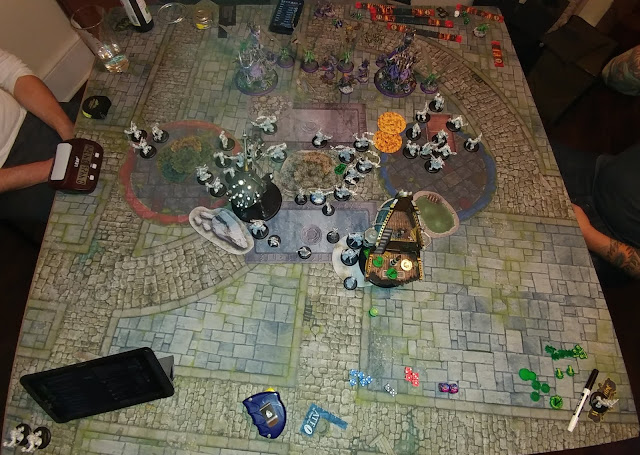
Bottom 2: He knew this would be feat turn and that there were lots of models to kill. Zaadesh upkept battle charged. Zaadesh popped his feat and charged a marauder. He bought a couple attacks to kill a total of three and then cast lightning strike to sprint back to safety. The archidon on the far right moved forward, killed a bloodgorger and then used its animus to sprint back. The other archidon on the right also charged to kill a bloodgorger, and triggered the crit pitch. The bloodgorger was thrown and landed on top of a group of three others (including Jussika). The thrown bloodgorger, Jussika and one other died, while the last one made its tough check. (Note - I have since looked up the rules for throws and this was played incorrectly. I was told the thrown bloodgorger would pass over same sized bases and then land using the rule of least disturbance. A thrown model stops when it contacts a base of equal or larger size). The archidon then sprinted back to stand just in front of the first archidon that activated. The turtle on the right then began its activation. It charged forward and killed three more bloodgorgers, but its shots once again failed to kill anything. It then repositioned back so the two archidons could counter charge anything that might attack it. The right agonizer stood next to the turtle and cried its strength debuff.
The shaman charged forward, killing a marauder and blocking up the area around the right side of the forest. An archidon on the right charged in and killed two marauders, but had no fury left to cast its animus. The turtle charged in and killed a bloodgorger with impact attacks and then killed a couple more with melee strikes. It took shots to kill several more and then repositioned back, keeping a toe in the left circle zone. The remaining two archidons just positioned around the left turtle to be ready to counter charge. The second agonizer positioned behind the turtle and cried its strength debuff. Jordan's turn ended with 26 minutes on the clock. Because he moved the right turtle back to be protected by the archidons, he gave me the right circle. We each scored our own rectangle zones. This opened the scoring with me up 2-1.
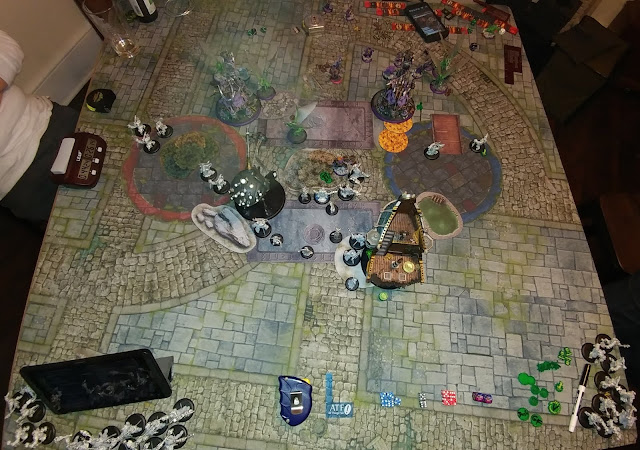
Top 3: I knew he had made a mistake by not keeping his turtle in the right zone. This meant that if I could find a way to kill the left turtle and his objective, I could score four points and win on scenario. Given how much of my army died on the previous turn, I felt this was by far my best chance for victory. The kraken should be able to handle the left turtle, and possibly put an attack or two into the objective as well. The only other thing that could really get to the objective would be Skarre with her three shots. Skarre upkept draconic blessing for free and allocated full focus to the kraken. She also rolled three for reinforcements and put three marauders behind the shaman. One was engaging an archidon to prevent counter charges and another was in melee with the objective to grant gang fighter. The only relevant activations were Skarre, the kraken and the left bloodgorgers who needed to position to grant gang fighter.
Skarre activated first. She cast draconic blessing on the kraken and then moved forward and put her three shots into the objective, leaving it on three health. The left bloodgorgers received the press forward order. The first one ran to engage the archidon behind the turtle. Defensive strike triggered and the bloodgorger died. A second bloodgorger ran to engage the same archidon. At this point, Jordan triggered counter charge on his only unengaged archidon on the left side of the board. The bloodgorger died to the counter charge. A third bloodgorger ran to engage both of the archidons, which effectively tied them all up. Another bloodgorger ran to engage the siege animantarax and promptly died to the defensive strike. Another bloodgorger ran to engage the turtle and the leader ran into the forest to keep both of the remaining grunts in formation. The kraken walked forward to have both the turtle and objective in its four inch melee range, but stayed outside the agonizer's aura. Between gang fighter and draconic blessing, the kraken was hitting the turtle at P+S 23 and killed it in three attacks. It then bought and attack to finish off the objective. Finally, the dirge seers ran into the left circle. I scored four points, winning on scenario 6-1. The game ended with 29 minutes on my clock.
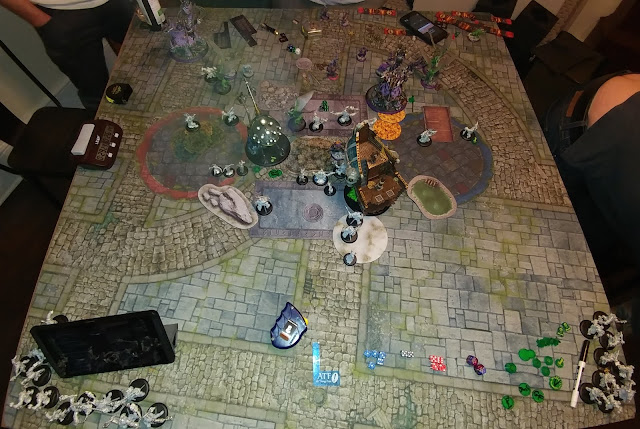
Analysis: I pulled out a win due to a pretty big misplay by my opponent. Had he kept the right turtle in the zone, I don't think I could have mustered enough pressure for a scenario win. I would have been up by enough that he would have had a long road to try and turn scenario into a win for himself. Likely the kraken would have still removed the one turtle, but focused its additional attacks on the archidon next to it. I also would have tried to position a little further away from the second turtle. If I could have kept outside its charge range, the kraken probably would survive. Assuming I managed to kill the middle archidon, only two archidons are unlikely to kill the kraken (40 damage on average assuming they hit every attack and they are enraged).
It is astonishing that the right turtle failed to kill a single model with its ranged attacks. This is unlikely to ever be repeated and would have likely resulted in the entire right unit of bloodgorgers being wiped out. However, that is offset by the additional kills he got from the incorrectly played throw. I am not sure what else I can do with the right bloodgorgers to protect them from the turtle. Its going to get to kill a lot between impact attacks, spear attacks, tail attacks and the gun. The archidons protecting it with counter charge were unneccessary in this matchup, but just pose and extra layer of problems to deal with.
I finally managed to keep Skarre back on turn 2 instead of getting over eager to shoot all her guns. I think the turtle's threat range was what really kept me in check. I was not too scared of the guns, but I did not want that thing to get in melee with Skarre. As always when I play this list into a matchup with lots of armor or boxes, keeping the kraken alive is the key. It's much harder to accomplish against the turtles, given the number of models they can removed from the table each round. Had this been in a tournament setting, I likely would have played my other list (currently Deneghra2 in dark host). I am starting to get very comfortable with this list and clock is usually not an issue anymore. I did not get to see how Ragman could help the list with additional hitting power. Likely he would have been key to bringing down the second turtle.
This was another hard fought game for me. I feel like I am getting good experience by playing this list into all matchups, including the bad ones. It will help make me that much more comfortable when I am looking to play it in a tournament. I don't think I will have a battle report for next week. Likely I will either post a rant about how much I don't like the tough mechanic, or I will talk about my list possibilities for the next scrum (starting in July). Thanks for reading!
Scenario: Standoff
I set up a game against Mark Howard. We were going to perform an experiment to see if his Iron Mother list could shoot down Skarre3. When I arrived, I was told that a change in opponents had been arranged and I would be playing against Jordan instead. As I had already discussed it with Mark, I only had my Skarre3 list and Jordan had brought his version of a Zaadesh2 list. Here are the lists.
[Skarre 3] Skarre, Admiral of the Black Fleet [+27] - Slaughter Fleet Raiders
- Kraken [36]
- Satyxis Blood Priestess [0(4)]
Axiara Wraithblade [0(6)]
General Gerlak Slaughterborn [0(6)]
Ragman [4]
Black Ogrun Iron Mongers [6]
Blighted Trollkin Marauders (max) [15]
Bloodgorgers (max) [15]
- Jussika Bloodtongue [5]
Bloodgorgers (max) [15]
Scharde Dirge Seers [6]
[Zaadesh 2] Lord Tyrant Zaadesh [+28] - Imperial Warhost
- Agonizer [0(6)]
- Agonizer [0(6)]
- Archidon [10]
- Archidon [10]
- Archidon [10]
- Archidon [10]
- Archidon [10]
- Basilisk Krea [0(7)]
- Cyclops Shaman [8]
Paingiver Beast Handlers (min) [5]
Paingiver Beast Handlers (min) [5]
Siege Animantarax [17]
Siege Animantarax [17]
I may have something wrong in his list, as I believe there was a mist speaker included, but what I have listed only leaves 1 extra point available. We rolled for initiative and I won. I know the archidons and turtles are fast, I felt like I needed to go first in order to establish the line of battle as far across the table as possible. I did not feel comfortable in this matchup and if I brought my normal pairing of Skarre3 SFR and Denny2 DH I probably would have played Denny2, but I figure getting these types of games in is always good practice.
Deployment: I went with my normal fairly symmetrical deployment with this list. A unit of bloodgorgers was on either flank, with Jussika attached to the right unit. The marauders deployed centrally. The kraken was placed between the marauders and the left bloodgorgers while Skarre went between the marauders and the right bloodgorgers. The dirge seers and iron mongers were spread out between the kraken and Skarre. Gerlack and Axiara were behind the marauders and next to Skarre's base, along with Ragman. The blood priestess stood behind Skarre.
Jordan deployed Zaadesh centrally. To Zaadesh's right was the Shaman, followed by a unit of beast handlers and an agonizer. A siege animantarax came next, with an archidon on the far right flank. To Zaadesh's left was the krea, followed by a unit of beast handlers and an agonizer. The second siege animantarax came next with another archidon on the left flank. The remaining three archidons were spread out across his back line.

Top 1: This was a standard first turn for me. Skarre activated first and cast dash, deceleration and put draconic blessing on the marauders. She then moved forward. The right bloodgorgers ran forward, arranging themselves around the acid pit. The marauders ran forward, with Gerlack, Axiara and Ragman taking up position behind them. The kraken ran forward, as did the left bloodgorgers. The dirge seers and iron mongers maintained their position of being spread out between Skarre and the kraken while running forward. Finally, the blood priestess moved up slightly. My turn ended with 54 minutes on the clock.

Bottom 1: Zaadesh cast battle charged and put inviolable resolve on something, probably one of the turtles. I think we ended up losing track of this later in the game, as I don't recall the armor buff getting factored into anything later on. At this point, he decided that my threat ranges were actually longer than he expected and he would go into defensive mode. His army rearranged a little bit, but overall moved forward less than three inches total. The right turtle took shots into my bloodgorgers, but either failed to crack armor, missed the shot or the tough roll was made. This was about the worst case scenario for him, since my bloodgorgers weren't knocked down and vengeance was triggered. The left turtle managed to kill two of the bloodgorgers in the unit. Both turtles repositioned back their three inches, putting them and inch or so behind his rectangle zone. The krea and shaman both put up the force aura and the agonizers. The beast handlers stood behind the two turtles, whipping to put rage tokens on them and then healing them back up. The right turtle ended with two rage tokens and the left ended with one. The two archidons on the flanks also took up positions behind their respective turtles and the three in the back moved up slightly to keep with the rest of the formation. Jordan's turn ended with 51 minutes on the clock.

Top 2: I had forgotten how far the turtles could threaten with their shots, and then reposition back to safety. However, he had been rather timid in committing to the scenario, so I hoped that I could run forward fast enough to jam him out for a turn or two and make that my avenue for victory. The right bloodgorgers used their vengeance movements to come out from behind the acid pit and a pair of them were able to move into charge range of the right turtle. Skarre upkept draconic blessing for free and allocated full focus to the kraken. Skarre activated first and popped her feat. She cast dash, deceleration and guided fire. I did not cast dark waves, since I did not think I had a decent target to move forward. She remained standing where she was, as moving forward to get her cannon shots off would potentially put her in threat range of his turtles or beasts.
The right bloodgorgers charged forward. When the first one made it to the right turtle, the archidon standing behind the turtle triggered counter charge and killed the bloodgorger. The second bloodgorger with charge distance charged the archidon and put a little damage on it. The remaining members of the unit ran forward, trying to jam up the right zone, while staying out of the fire cloud. The marauders ran forward and around the forest in the center of the table. Gerlack, Axiara and Ragman all took up positions behind the center forest. The kraken walked forward and shot at the krea. Between the flayer cannon shots and helldriver, the krea died and the aoe blast killed a pair of beast handlers. The left bloodgorgers then ran forward around the forest in the left circle zone. Because of the lack of pathfinder, I was not really able to position to jam as effectively as the right unit did. The iron mongers walked forward with two repairing Skarre and the third standing by the kraken. The dirge seers maintained their formation between the huge bases and the blood priestess moved forward to stand closer to Skarre. My turn ended with 44 minutes on the clock.

Bottom 2: He knew this would be feat turn and that there were lots of models to kill. Zaadesh upkept battle charged. Zaadesh popped his feat and charged a marauder. He bought a couple attacks to kill a total of three and then cast lightning strike to sprint back to safety. The archidon on the far right moved forward, killed a bloodgorger and then used its animus to sprint back. The other archidon on the right also charged to kill a bloodgorger, and triggered the crit pitch. The bloodgorger was thrown and landed on top of a group of three others (including Jussika). The thrown bloodgorger, Jussika and one other died, while the last one made its tough check. (Note - I have since looked up the rules for throws and this was played incorrectly. I was told the thrown bloodgorger would pass over same sized bases and then land using the rule of least disturbance. A thrown model stops when it contacts a base of equal or larger size). The archidon then sprinted back to stand just in front of the first archidon that activated. The turtle on the right then began its activation. It charged forward and killed three more bloodgorgers, but its shots once again failed to kill anything. It then repositioned back so the two archidons could counter charge anything that might attack it. The right agonizer stood next to the turtle and cried its strength debuff.
The shaman charged forward, killing a marauder and blocking up the area around the right side of the forest. An archidon on the right charged in and killed two marauders, but had no fury left to cast its animus. The turtle charged in and killed a bloodgorger with impact attacks and then killed a couple more with melee strikes. It took shots to kill several more and then repositioned back, keeping a toe in the left circle zone. The remaining two archidons just positioned around the left turtle to be ready to counter charge. The second agonizer positioned behind the turtle and cried its strength debuff. Jordan's turn ended with 26 minutes on the clock. Because he moved the right turtle back to be protected by the archidons, he gave me the right circle. We each scored our own rectangle zones. This opened the scoring with me up 2-1.

Top 3: I knew he had made a mistake by not keeping his turtle in the right zone. This meant that if I could find a way to kill the left turtle and his objective, I could score four points and win on scenario. Given how much of my army died on the previous turn, I felt this was by far my best chance for victory. The kraken should be able to handle the left turtle, and possibly put an attack or two into the objective as well. The only other thing that could really get to the objective would be Skarre with her three shots. Skarre upkept draconic blessing for free and allocated full focus to the kraken. She also rolled three for reinforcements and put three marauders behind the shaman. One was engaging an archidon to prevent counter charges and another was in melee with the objective to grant gang fighter. The only relevant activations were Skarre, the kraken and the left bloodgorgers who needed to position to grant gang fighter.
Skarre activated first. She cast draconic blessing on the kraken and then moved forward and put her three shots into the objective, leaving it on three health. The left bloodgorgers received the press forward order. The first one ran to engage the archidon behind the turtle. Defensive strike triggered and the bloodgorger died. A second bloodgorger ran to engage the same archidon. At this point, Jordan triggered counter charge on his only unengaged archidon on the left side of the board. The bloodgorger died to the counter charge. A third bloodgorger ran to engage both of the archidons, which effectively tied them all up. Another bloodgorger ran to engage the siege animantarax and promptly died to the defensive strike. Another bloodgorger ran to engage the turtle and the leader ran into the forest to keep both of the remaining grunts in formation. The kraken walked forward to have both the turtle and objective in its four inch melee range, but stayed outside the agonizer's aura. Between gang fighter and draconic blessing, the kraken was hitting the turtle at P+S 23 and killed it in three attacks. It then bought and attack to finish off the objective. Finally, the dirge seers ran into the left circle. I scored four points, winning on scenario 6-1. The game ended with 29 minutes on my clock.

Analysis: I pulled out a win due to a pretty big misplay by my opponent. Had he kept the right turtle in the zone, I don't think I could have mustered enough pressure for a scenario win. I would have been up by enough that he would have had a long road to try and turn scenario into a win for himself. Likely the kraken would have still removed the one turtle, but focused its additional attacks on the archidon next to it. I also would have tried to position a little further away from the second turtle. If I could have kept outside its charge range, the kraken probably would survive. Assuming I managed to kill the middle archidon, only two archidons are unlikely to kill the kraken (40 damage on average assuming they hit every attack and they are enraged).
It is astonishing that the right turtle failed to kill a single model with its ranged attacks. This is unlikely to ever be repeated and would have likely resulted in the entire right unit of bloodgorgers being wiped out. However, that is offset by the additional kills he got from the incorrectly played throw. I am not sure what else I can do with the right bloodgorgers to protect them from the turtle. Its going to get to kill a lot between impact attacks, spear attacks, tail attacks and the gun. The archidons protecting it with counter charge were unneccessary in this matchup, but just pose and extra layer of problems to deal with.
I finally managed to keep Skarre back on turn 2 instead of getting over eager to shoot all her guns. I think the turtle's threat range was what really kept me in check. I was not too scared of the guns, but I did not want that thing to get in melee with Skarre. As always when I play this list into a matchup with lots of armor or boxes, keeping the kraken alive is the key. It's much harder to accomplish against the turtles, given the number of models they can removed from the table each round. Had this been in a tournament setting, I likely would have played my other list (currently Deneghra2 in dark host). I am starting to get very comfortable with this list and clock is usually not an issue anymore. I did not get to see how Ragman could help the list with additional hitting power. Likely he would have been key to bringing down the second turtle.
This was another hard fought game for me. I feel like I am getting good experience by playing this list into all matchups, including the bad ones. It will help make me that much more comfortable when I am looking to play it in a tournament. I don't think I will have a battle report for next week. Likely I will either post a rant about how much I don't like the tough mechanic, or I will talk about my list possibilities for the next scrum (starting in July). Thanks for reading!
Comments
Post a Comment